


Link to the installation video for the Wall Display Frame for LEGO Concorde 10318
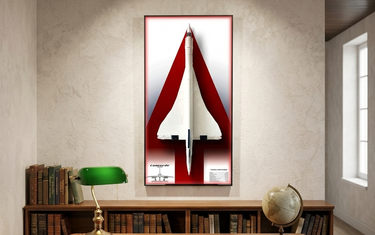
The Concorde is a miracle in aviation history, representing humanity's ultimate pursuit of speed and elegance. The LEGO Icons 10318 model accurately recreates its slender fuselage and iconic droop nose. However, this masterpiece, measuring over 1 meter (41.5 inches) in length, often occupies significant desk space and makes it difficult to fully appreciate its beautiful lines.

To pay tribute to this supersonic legend, we designed this museum-grade wall-mount display frame. The backing board features minimalist supersonic visual elements paired with custom 3D-printed/acrylic supports, specifically designed to solve the storage pain points of large-scale models. With the built-in LED ambient light strips, the display frame not only protects the model but also uses soft light and shadows to outline the aircraft's silhouette, making it appear as if it is cruising through the clouds. This is more than just a display case; it is an art installation for aviation enthusiasts.

3. Detailed Installation Instructions
Step 1: Preparation and Component Check Begin by laying out all components of the kit on a flat surface. You should have the themed backing board (with integrated LED strips), the clear acrylic support blocks, the necessary screws and nuts, and heavy-duty black nylon cable ties.

Step 2: Installing the Primary Support Base Locate the pre-drilled mounting hole in the center of the board's graphic. Position the transparent acrylic support block over the hole and secure it tightly using the provided screw and nut. This block is crucial as it will carry the primary weight of the Concorde's fuselage.
Step 3: Preparing the Security Fasteners Thread a black nylon cable tie through the two upper holes from the back of the board to the front. This creates a secure loop that will later be used to anchor the aircraft's body firmly against the display board.

Step 4: Aligning the Aircraft Carefully lift your assembled LEGO Concorde and align it vertically with the board. Rest the underbelly of the plane onto the acrylic support block you installed in the previous step, ensuring the model is centered.

Step 5: Securing the Model While holding the plane steady, feed the cable tie through the internal Technic structure of the LEGO model, typically near the landing gear bay area. Thread the tie back through the second hole to the rear of the board and pull it until the aircraft is flush and stable against the surface.

Step 6: Trimming for a Clean Finish Once the aircraft is securely fastened, use a pair of wire cutters to snip off the excess end of the nylon cable tie. This ensures a professional and seamless look without any distracting plastic tabs showing.

Step 7: LED Lighting Functional Test Connect the frame's power cable to a power source. Use the included remote control to activate the LED backlighting. Test the various lighting modes and colors to ensure the light strip correctly outlines the "Supersonic" silhouette of your model.

Step 8: Final Wall Installation With the aircraft fully secured and tested, lift the entire frame unit. Hang it onto your wall using the pre-installed heavy-duty brackets. Ensure you use wall anchors suitable for the combined weight of the display and the LEGO model. View More 🛒
Pro Tip: For the best visual impact, we recommend mounting the frame at eye level to fully highlight the sleek lines and silhouette of the aircraft.